Learn how to track and log emails utilizing the Outlook desktop add-in
Use the Track and Log features of the HubSpot Sales Outlook desktop add-in to monitor and keep a record of your contacts' engagement with your emails. With the Track feature enabled, you can receive real-time notifications when a contact opens your email. You can also choose to log the email to the contact's record in HubSpot, and this will keep a record of all past communication for your team to reference.
You can review email "open" and "click" metrics in the activity feed. Logged emails are saved to individual contact records and their associated records.
Please note: if you've enabled General Data Protection Regulation (GDPR) functionality in your account, your legal team is the best resource to determine how your company uses email logging and tracking. You can also customize your extension settings to disable this function for a specific message or for specific contacts or email domains. Any existing contacts who have not granted a lawful basis for data processing will be tracked anonymously.
Before getting started, note the difference between a tracked email and a logged email:
- Track: use the Track feature to monitor when contacts open your emails. To track emails, HubSpot inserts a one-pixel tracking image into the email after it is sent. If you have the HubSpot Sales for Windows tray app installed or if you're using Chrome with the HubSpot Sales Chrome extension, you'll receive a real-time notification on your desktop when a contact opens the tracked email. Users with assigned Sales Hub paid seats can also track when a recipient clicks a link in the email. Free users cannot track clicks. HubSpot records tracked email "opens" and "clicks" in the activity feed and on the record's timeline. Selecting the Track Email checkbox will not log a copy of the email to the record in HubSpot.

- Log: use the log feature to log a copy of an email to a record in HubSpot. Any attachments included in the email will also log to the contact's record. Log your emails to keep a record of past communication. Logged emails do not give you insight into open or click information.

Keep in mind that you can send an email that is both tracked and logged. That way, you'll have a record of the email communication and open information in HubSpot.
Tracking emails
To send a tracked email using the Outlook desktop add-in from your Outlook desktop account on a PC:
- Log in to your Outlook account.
- Compose a new email.
- Enter the email recipient, subject line, and email body.
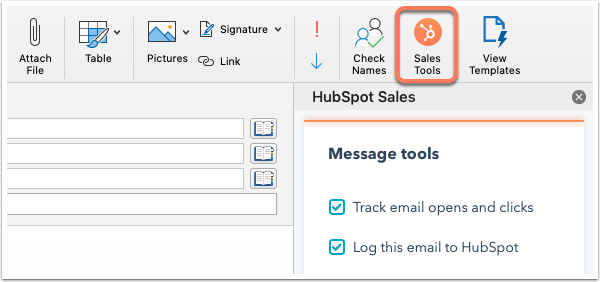
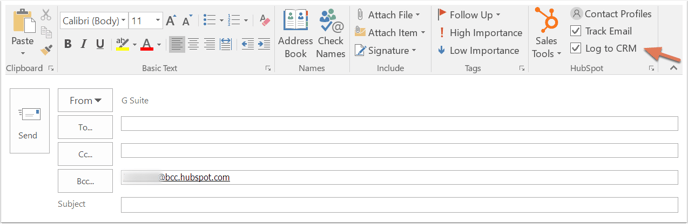
- Select the Track Email checkbox in the message ribbon, then click Send.
View the tracked email's status
Before your contact opens the email, the email subject line and recipient will show in your activity feed in HubSpot as Sent.

When the recipient opens the email, you'll receive a real-time pop-up notification on your desktop and the email notification marked as Open in your activity feed. Click the dropdown menu below the contact's name to see when the recipient opened your email. You will also see a history of the contact's activities listed in the dropdown menu.
Logging emails
To log an email and add new contacts to HubSpot from a logged email, the email address you send from in your email client must be one of the following:
- A user in your account.
- One of your connected email addresses.
You can specify email addresses and domains that you never want to log emails for in your HubSpot account settings. Or you can add these email addresses and domains in your add-in settings.
Please note: email attachments larger than 50 MB will not log to HubSpot. Your email will still be delivered successfully to the contact and will log to the CRM, but without an attachment.
To send a logged email using the Outlook desktop add-in from your Outlook desktop account on a PC:
- Compose a new email in Outlook.
- Enter the email recipient, subject line, and email body.
- In the message ribbon, select Log to CRM. Your BCC address will auto-populate in the BCC field.
- You can choose to log the email to the email recipients' associated records. By default, the add-in will automatically select the contact's first three associated deal records to log emails to. To explicitly select which associated records to log the email to:
- Below the Log to CRM checkbox, click the records dropdown menu.
- Select the checkboxes next to the records to log the email to.
- If you're sending the email to a recipient who isn't contact in your CRM, a new contact record will be created. You'll see the contact's email listed when editing the associations. Clear the checkbox if you don't want the email to log to the new contact record. Learn how to log emails to existing contacts only.
- Click Send.
View the logged email in HubSpot
Email that are logged to HubSpot using the Outlook desktop add-in will automatically be associated to the records that you specified before sending the email. To see the logged email in HubSpot:
To see the logged email in HubSpot:
- In your HubSpot account, navigate to your records:
- Contacts: In your HubSpot account, navigate to Contacts > Contacts.
- Companies: In your HubSpot account, navigate to Contacts > Companies.
- Deals: In your HubSpot account, navigate to Sales > Deals.
- Tickets: In your HubSpot account, navigate to Service > Tickets.
- Click the name of the record.
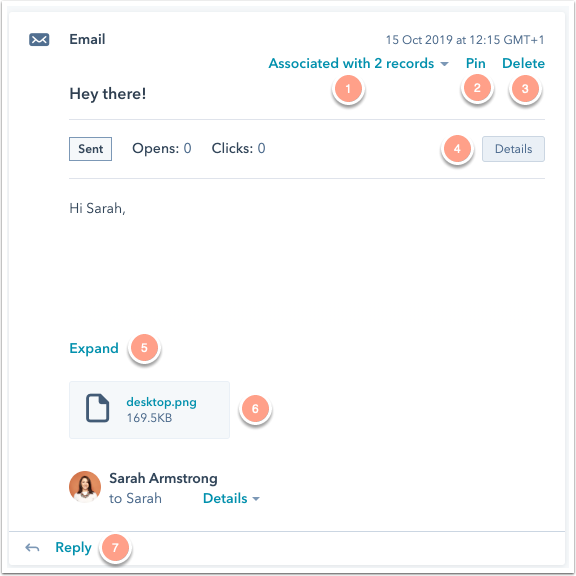
- On the timeline, locate the logged email. From the email, you can do the following:
- Associated records: click to edit the associated records.
- Pin: click to pin the email to the top if the timeline.
- Delete: click to delete the email activity from the timeline.
- Details: click to see specific information about the email send.
- Expand: click to see the full body of the email. If there's an ongoing email conversation, click View thread to see all of the emails in the thread.
- Attachments: click to open attachments associated with this specific email send.
- Reply: click Reply to send an email reply to the contact from HubSpot.
Please note: in order to send email replies from HubSpot and log incoming replies to HubSpot, you must have a connected inbox.